OFFICIAL MANUAL / GETTING STARTED
Shadowrocket User Guide
Follow the steps in order: add a server, choose a mode, connect, verify, and troubleshoot. This guide uses the iPhone / iPad interface to establish a connection you can check before adjusting rules or Settings.
Screenshots help identify interface elements and fields; they are not meant to be copied field by field. Fields vary with the selected Type and app interface. Use your existing server details for all connection settings.
STEP 01 / ADD SERVER
Add a server or import an existing subscription
First identify whether you have a subscription link, a single server link, or server details to enter manually.
Enter details manually: Home → Add Server
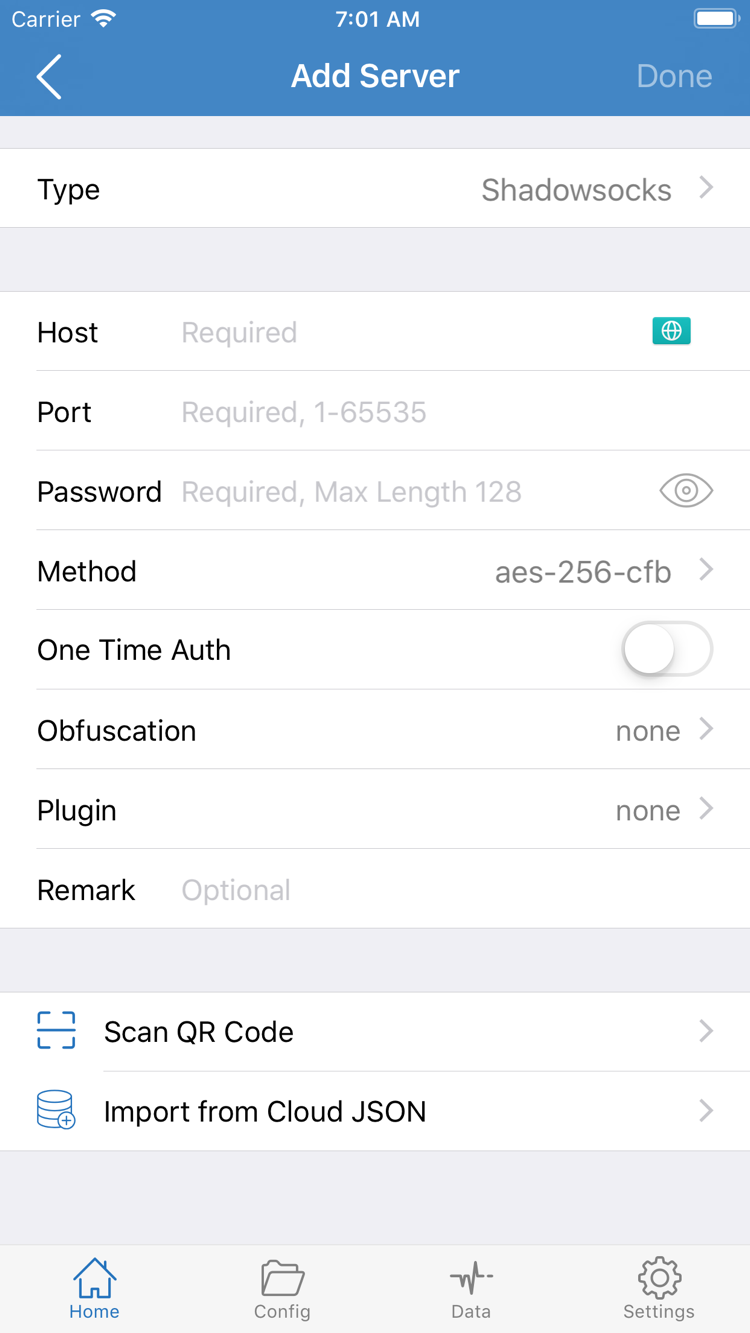
Open Shadowrocket and find Add Server in the SERVER group near the bottom of Home. Tap Type, choose the protocol specified in your provider’s details, and fill in the remaining fields. Type determines which fields appear, so do not enter a password and then switch protocols at random. Do not infer the protocol from the port number alone.
For the fields shown in the screenshot, enter the server hostname or IP address in Host, the server port in Port, the corresponding password in Password, and the specified encryption method in Method. Host is not a webpage address bar; do not paste a subscription link with a path into it. Other Types may show different authentication or transport fields. Check each one carefully; do not reuse credentials from one protocol with another.
When finished, save and return to Home. Confirm that the new entry appears under SERVER. Its presence only means the details were saved; it does not confirm that the server is working. Check the displayed name and address, then verify later with Connectivity Test and an actual request. If the entry has extra spaces or line breaks, return to the edit screen and correct them.
Import multiple servers: Subscribe
If you have a subscription link, open Config and find Subscribe. Paste the complete link as prompted, then save or update it. A subscription link retrieves a set of server details, while a single server link describes one connection; they serve different purposes. After importing, return to Home, confirm that the servers appear in the list, and select the one you intend to use.
Subscription links often contain account-specific information. Copy the full link, but do not show it in public screenshots or support requests. If import fails, first make sure the clipboard contains only the link, without surrounding text, quotation marks, or line breaks. Then check whether your provider requires you to enable the subscription in your account. Updating does not change your account status or the server settings on the provider’s side.
If you have a QR code, use Scan QR Code on the Add Server page, grant camera access, and scan your existing details. Import from Cloud JSON is for the relevant JSON data source; it is not a general-purpose subscription field. Do not keep trying an arbitrary webpage URL in different import options. If you are unsure of the format, check the instructions that came with your details, then see Four Ways to Import a Subscription.
At the end of this step, Home should show a server you can select. Next, decide how traffic should be handled; there is no need to change DNS or other advanced settings yet. Adding a server and choosing the right Global Routing mode are separate steps.
STEP 02 / GLOBAL ROUTING
Choose a Global Routing mode
The server determines which details are used for the connection; Global Routing determines how requests are handled.
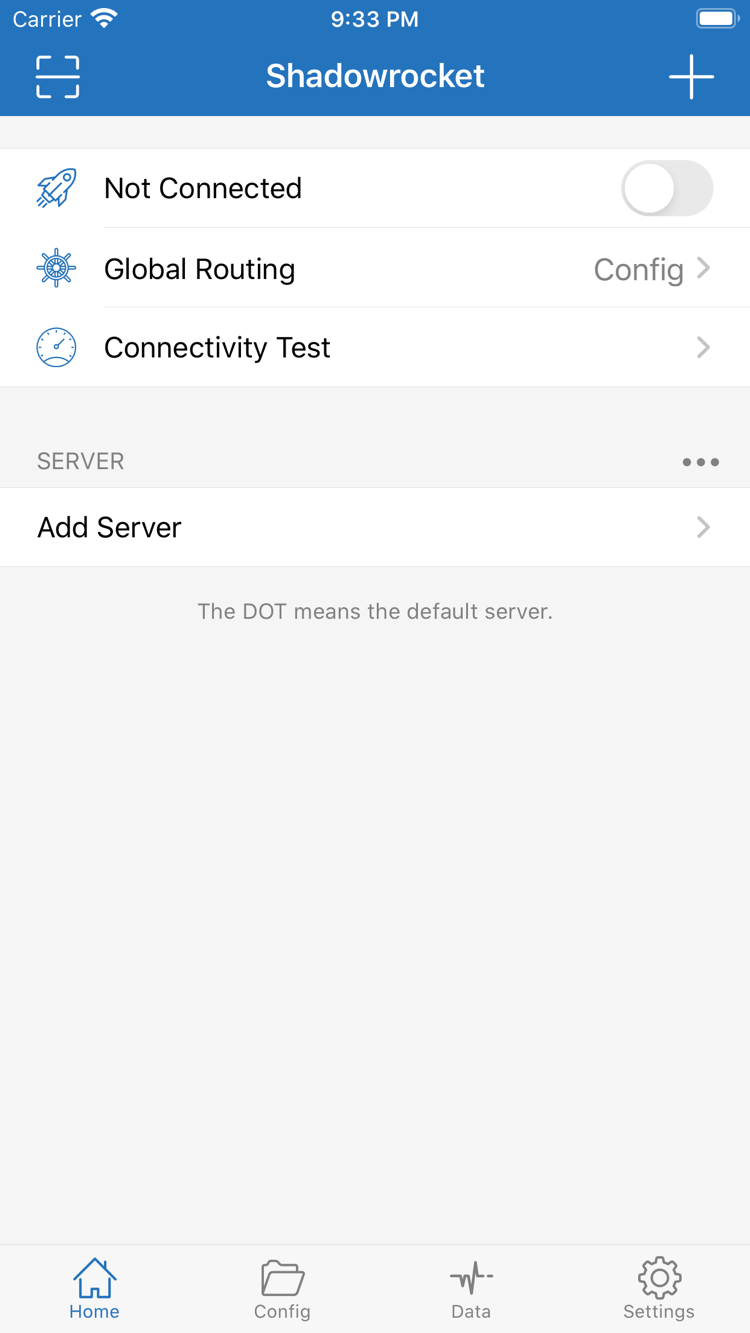
Return to Home, tap Global Routing, and choose Config, Proxy, or Direct according to your current needs. These modes are not connection quality levels and do not represent different protocols. Before connecting for the first time, check your selection. Even correctly entered server details can produce unexpected results if the selected mode is not what you intended.
Everyday routing: Config
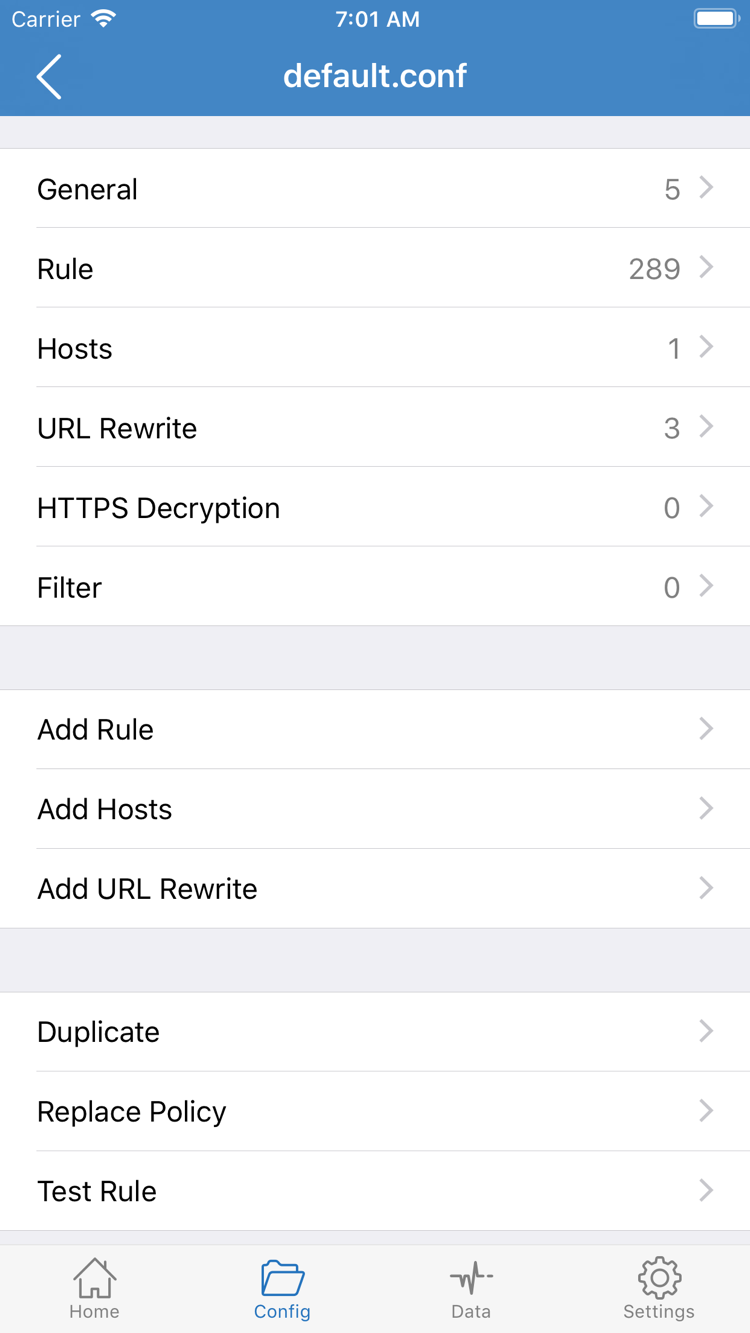
Config handles requests according to the rules in the currently enabled config. Destinations that need a proxy should match the relevant policy; destinations that should be accessed locally can match DIRECT. Open Config and confirm which config is actually selected. Its editor contains sections such as General, Rule, Hosts, URL Rewrite, and HTTPS Decryption. This is config file content, not the server subscription list.
For now, confirm that a config is enabled and understand that Rule handles rule matching. Rules are usually evaluated from top to bottom; the first match is applied, and FINAL handles requests that have not matched earlier rules. Do not enable URL Rewrite or HTTPS Decryption just to make the first connection, and do not mistake Add Rule for the option to add a server. See the glossary for rule keyword definitions and the settings reference for specific options.
Temporary comparison: Proxy and Direct
Proxy can help you temporarily check whether a proxy route can access a destination. It does not mean that every app or type of system traffic is handled the same way. Direct can help check local network access, but it cannot verify that a proxy server is working. These modes clarify the route used for a test; avoid switching between them repeatedly during troubleshooting and then forgetting to restore the original mode.
For example, if a destination works in Proxy but fails in Config, first inspect the rule and policy matched by that destination rather than immediately recreating the server. After comparing, restore Config and confirm that the intended config is selected. Then return to Home with the chosen server and mode in place, ready to turn on the connection switch at the top.
STEP 03 / CONNECT
Connect and confirm VPN permissions
Select a server before turning on the switch at the top. After granting system permission, check the actual status in the app.
In the SERVER group on Home, select the server you plan to use and confirm that the selection indicator is on the correct entry. If you have multiple subscription groups, check which group an entry with a repeated name belongs to. Confirm that Global Routing is still set to the mode you chose, then turn on the connection switch at the top, in the Not Connected area.
When connecting for the first time, iPhone / iPad may show a system prompt to add a VPN configuration. Confirm that you initiated this action in Shadowrocket, tap Allow, and complete device authentication as required by the system. This lets the system create a VPN configuration for the app; it does not enter server details or confirm that your provider’s service is working.
After granting permission, return to Home and wait for the status to change. If the switch immediately turns off again, do not tap it repeatedly. First check whether a system prompt is still waiting for a response, then check the VPN configuration status in system settings. If you previously tapped Deny by mistake, return to the app and try connecting again. If the system configuration was deleted, you will need to grant permission again. See VPN Configuration Prompt Explained for more details.
If another VPN connection is already active on the device, confirm which connection is currently routing network traffic. Otherwise, you could mistake another connection’s status for Shadowrocket’s. Managed devices may also have organization-imposed restrictions; follow your device management requirements and do not remove management configurations you do not recognize just to connect.
Once the connection status at the top changes, leave the current settings alone for now. The VPN indicator in the system status bar only shows the tunnel status; it does not prove that a target webpage is reachable. Next, check the server test, actual requests, and matched rules together.
STEP 04 / CONNECTIVITY TEST
Verify that the connection is working
Test results, access to a destination, and rule logs answer different questions and should be checked separately.
Test the server, then open an actual destination
Use Connectivity Test on Home and see whether the current server completes the selected test. A timeout can help guide further troubleshooting, but a successful test does not mean every destination is reachable. The test method and target may differ from a real request. Do not judge the provider’s service from a single test result, and do not compare entries before confirming how they are tested.
Keep the connection active, then use a browser to visit a page whose content you can normally confirm is working, followed by the destination you need. Make a new request rather than relying only on a page that has already loaded or cached content. If the browser shows an old result, reload the page; if needed, close it and open it again. Avoid changing the mode, server, and Wi-Fi at the same time, or it will be difficult to tell what changed the result.
Check matched policies in Config
Return to Shadowrocket and check Data or the connection log available in the current interface. Find the request you just made and check its destination domain, matched rule, and final policy. If a destination expected to use a proxy matches DIRECT, first inspect the config and rule order. If a destination expected to connect directly uses a proxy, start with its matching conditions rather than deleting all the rules.
You can make a controlled comparison: note the current mode and server, temporarily change only Global Routing, then make a new request to the same destination. If the difference is consistent, you have a direction for troubleshooting. Restore Config after testing. The exit address shown by a webpage only reflects the route used for that particular request; it does not prove that all device traffic follows the same policy.
At this stage, success means the connection stays active, the destination opens normally, and the policy in the log matches your expectations. Once all three are confirmed, consider automatic connections or more specific rules. If only one item fails, continue to the next step using the current setup; there is no need to reinstall the app or clear all your details.
STEP 05 / SETTINGS & DIAGNOSTICS
Troubleshoot by where the failure occurs
Check your input and basic network first, then permissions, DNS, and rules. Do not change all Settings at once.
Import fails or the test times out
If no entry appears after importing, return to the first step and check the link type, completeness, and update result. If the update succeeds but the server test times out, disconnect first and check that your local network works, then verify which server is selected. An entry appearing in a subscription only means that details were received; it does not guarantee that the associated service is currently available.
Check Type, Host, Port, Password, and Method one by one, along with any other authentication and transport parameters required by the protocol. Watch for capitalization, extra spaces, or missing text. Keep the system time accurate, as it can affect connections that require time validation. If the issue persists, ask your provider to confirm your existing details and service status. See Troubleshooting Server Timeouts and Connection Failures for a complete checklist.
The test succeeds, but webpages do not open
First check whether all webpages fail or only one destination. If only some destinations fail, check their domain and matched policy in Data or the connection log. If a connection is established but name resolution fails, check the DNS settings. A successful server test does not rule out DNS issues, and swapping in arbitrary DNS addresses one by one is not a reliable fix.
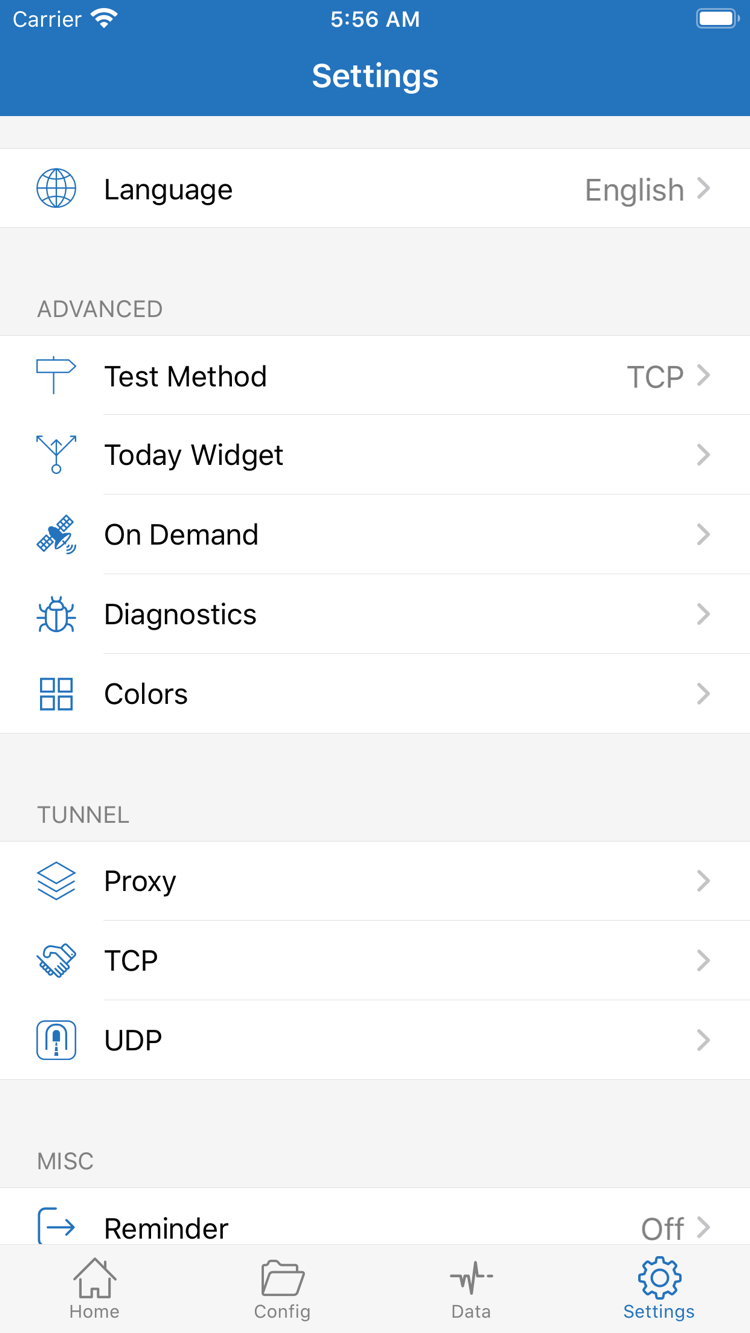
Open Settings to find groups such as Test Method, On Demand, Diagnostics, Proxy, TCP, and UDP. Test Method affects how tests are run; Diagnostics helps collect clues for troubleshooting. Neither replaces server settings. The exact location and fields for DNS depend on the current interface. During initial troubleshooting, record the original values and adjust only what relates to an observed issue. See DNS and Webpage Loading Issues.
The connection drops or reconnects after being turned off
If the switch turns off immediately after you enable it, first check the VPN permission, system prompt, and current connection log from step three. If the connection comes back after you turn it off manually, check whether On Demand is configured. During troubleshooting, note its existing conditions, temporarily disable automatic activation, and reproduce the issue manually. Decide whether to restore it after identifying the cause so automatic connections do not obscure the test.
Today Widget provides shortcuts or related status information; it is not required for the first connection. Proxy, TCP, and UDP groups affect more detailed connection behavior, so this guide does not recommend changing them in advance. For field definitions, default behavior, and the basis for choosing values, continue to the Settings reference. Do not copy settings combinations unrelated to your current protocol.
If you need to save diagnostics, keep only the parts that help explain the issue and hide subscription links, passwords, and other authentication data. Describe which step failed, whether all destinations are affected, whether the issue recurs on another network, and which setting you most recently changed. This information is more useful for troubleshooting than repeatedly importing or toggling the connection.
PLATFORMS / NEXT STEPS
Other devices and next steps
The steps above use the iPhone / iPad interface and do not directly cover the interface on other platforms. The iPhone / iPad version is a one-time purchase of $2.99 on the App Store. The Mac (Apple Silicon and Intel), Windows, Android, and Linux versions are free; get their installers from this site’s download page.
After verifying the connection, keep a working config before exploring rules or automatic connections. Use the glossary for terms and the settings reference for Settings. Make further changes only when you have a specific need.